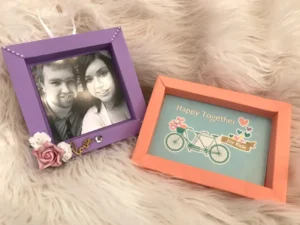
Today I will show you how to make these cute paper picture frames!
These can be used to frame photos, postcards, small scrapbook pages or inspirational quotes.
The possibilities are endless as you can customise these frames to any size you like – You could make a whole gallery!
For both square or rectangular shaped frames the technique remains the same (simple maths below!)
For this project you will need:
- 1 Piece of thick card stock (the thicker the better)
- Scoring board
- Scissors
- Ruler
- Glue (I recommend roller tape glue)
- Image or quote you wish to frame
- A toothpick (or something similarly shaped)
Step One:
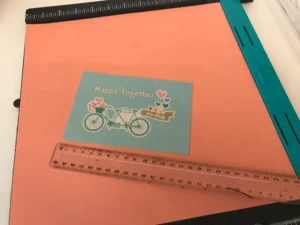
- Measure the item you are framing (My example here using this cute bicycle is 15 x 10cm)
- Deduct the largest measurement from above from the measurement of your card stock (My example here used 30x30cm cardstock: so that means 30cm-15cm=15cm)
- Divide your answer by two and that will be what we have on each side to work with (15cm/2 =7.5cm)
- As we need the frame to be even on all sides, we will need to cut the card stock smaller to accommodate the same measurements for the 10cm side of the image.
- To work this out, simply take your measurement (10cm) and add the same measurement as for the sides to the top and bottom (7.5cm each) (10cm+15cm=25cm) Cut one side of the card stock to 25cm
Step Two:
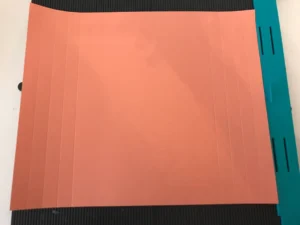
- You will need to divide your allocated measurement to allow for five sections (ie: 7.5cm/5=1.5cm) (Tip: this answer is how wide your frame edge will be – If you want a smaller frame simply trim your paper smaller to begin with)
- Score 4 lines using your above measurement (i.e: at 1.5cm, 3cm, 4.5cm and 6cm) all the way across on all 4 sides of your page (Tip: Score on the ‘front’ side of the card that you want to ‘see’ as your frame edge in the end)
Step Three:
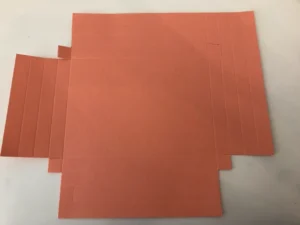
- On all four corners of your page you will see you have scored ‘squares’
- Cut away these squares leaving only 1 single square remaining, attached to the outsides of your inner row of your top and bottom sides.
- Cut the inner edge of this square also so that it becomes a flap (adjoined only to the top or bottom side)
Step Four
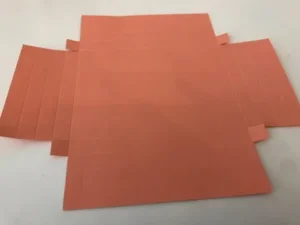
- On the top and bottom sides of your frame, on the second row in from the outside of the page, measure 1.5cm from the side edge of the page into the centre (see image).
- Do this on both the left and right sides
- Score or mark this line across the width of the row (it will be a cut line)
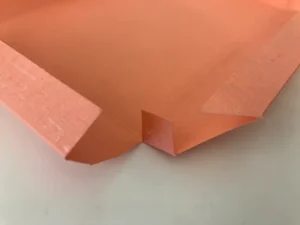
Step Five:
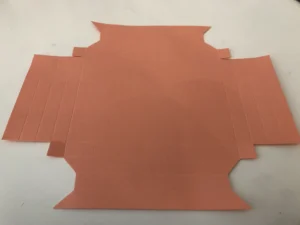
- Start from the outer corner of your page and cut on an angle to join the edge of your marked line
- Cut ‘straight’ down your marked line
- Cut on an angle to the outer corner of the next row
- You should now have cut away what looks like a triangle with a flat top (or half a hexagon)
- Do this on all 4 sides
Step Six:
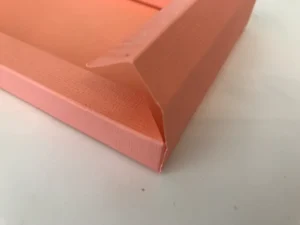
- Fold and burnish all folds in an upwards (mountain) fold.
- Turn your card stock over and you should be able to see roughly how your frame will take shape.
- If you would like to mount your image prior to adhering the sides of the frame, centre and glue your image flat to the inner base now (or you can add it later)
Step Seven:
- Apply glue to the outside of the four edge rows and the outside of the 4 flaps
- Glue the top and bottom sides down first by folding them over (around) until the bottom edge meets the side edge forming a ‘3d’ rectangle, press into place
- Fold your side pieces in the same manner as your top and bottom and you will see where the ‘flap’ should join the side edge, press flaps into place
- As you can see now – Simply folding the sides edges over doesn’t look like it will fit (it will) – This is where your toothpick comes in handy.
- Using your toothpick, gently lift the top edge and slide the side rectangle inside, do this with all 4 corners.
- If you did not adhere your image prior to sticking down the sides you can insert it now – You can also mount your image on foam tape if you do not wish to glue it flat.

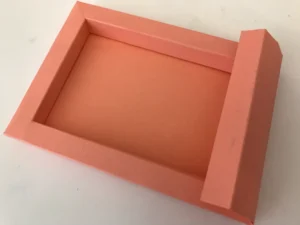
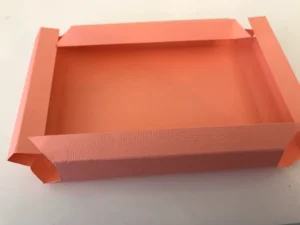
Ta-Da!
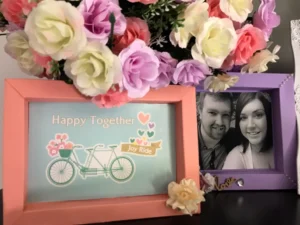
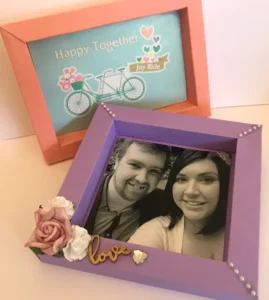
Your frame is now complete and you can decorate as you wish! (I added some flowers and pearl strips)
If you would like to make a stand for your frame, simply take a rectangular off-cut and fold/stick it into a triangle shape and adhere to the back of the frame.
You can also attach string or ribbon to the back of the frame to make a wall hanger.
These frames are so lightweight they can also be blu-tacked to the wall!
Here’s a closer look at my finished frames: